How to mount an encrypted Google Drive folder with rclone
The objective of this tutorial is to mount a folder on your server to store content without thinking about storage capacity. Everything on this folder is going to be, on the fly, encrypted and pushed to Google Drive. It comes also with caching!
The objective of this tutorial is to mount a folder on your server to store content without thinking about storage capacity. Everything on this folder is going to be, on the fly, encrypted and pushed to Google Drive. It comes also with caching if you want to use this folder to store your Jellyfin, Emby, Plex or any other media center application library.
IMPORTANT NOTICE
1. Always backup yourrclone.conffile in several secured locations, if lost you will not be able to decrypt your data.
2. Google limits the upload on Google Drive to 750 Gb / day. If you exceed it you might get a 24 hours ban.
Haaaave you met Rclone?
Users call rclone "The Swiss army knife of cloud storage", and "Technology indistinguishable from magic".
"Rclone is a command line program to manage files on cloud storage. It is a feature rich alternative to cloud vendors' web storage interfaces. Over 40 cloud storage products support rclone including S3 object stores, business & consumer file storage services, as well as standard transfer protocols." - rclone.com
Install Rclone
Rclone is pretty straight-forward to install with an one-line script. This line also works on a Synology NAS.
curl https://rclone.org/install.sh | sudo bashYou can also find all binaries to install it on rclone.org.
Note for Synology users: You need to enable the user home service to use Rclone as its configuration will be stored in/var/services/homes/thelazyfox/.config/rclone/rclone.conf.
To enable it, open "Control Panel" > "User & Group" > "Advanced" > "User Home" > "Enable user home service" > "Apply"
Create a Google Drive API application
Google is providing API keys for almost all its services, including Google Drive.
We need to create one for rclone so let's get started!
- Login on Google API Console
- Create a project (Psst, you can call it "Rclone"!)
- Click on "Enable APIs and Services" and search for "Google Drive API"
- Open it and click on "Enable"
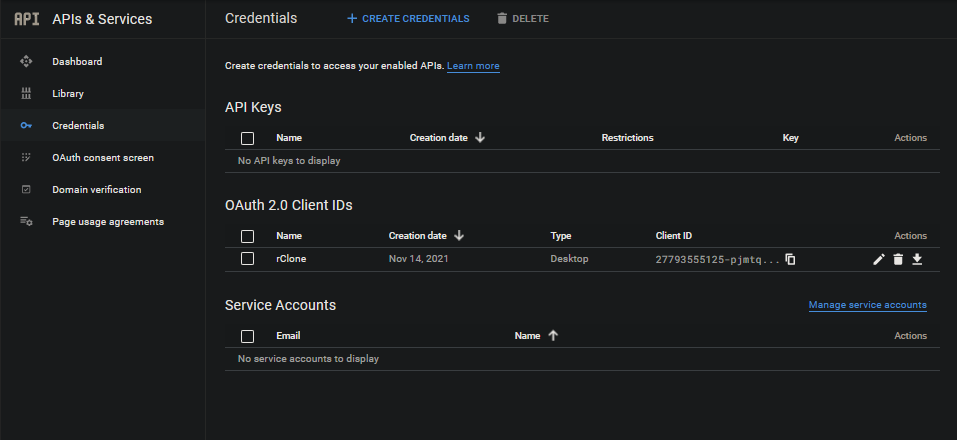
- Open the left panel and click on "Credentials"
- Now Click on "Create credentials" > "OAuth client ID"
- If it's your first time in there, you will need to create and design the OAuth consent screen. It's the screen which ask for permissions to use your Google Account / Services. You just have to define few parameters like name and type "External"
- When you are all set, go back to the "OAuth client ID" creation flow
- Choose your application type ("Desktop app" is fine) and name it (what about "Rclone" again?)
- A pop-in is now displaying your "Client ID" and your "Client secret", keep it open, you will need them very soon. You can see them on demand by clicking on the pencil edit icon
Create a Rclone remote drive (not encrypted)
Now it's time to setup rclone!
Start by executing the command rclone config.
Create a new remote drive
No remotes found - make a new one
n) New remote
r) Rename remote
c) Copy remote
s) Set configuration password
q) Quit config

n/d/r/c/s/q> n
Choose n to create a new remote drive and then, give it a name and hit Enter. I chose "GDrive1" to know which storage provider it uses and to easily increment it if I need new ones.
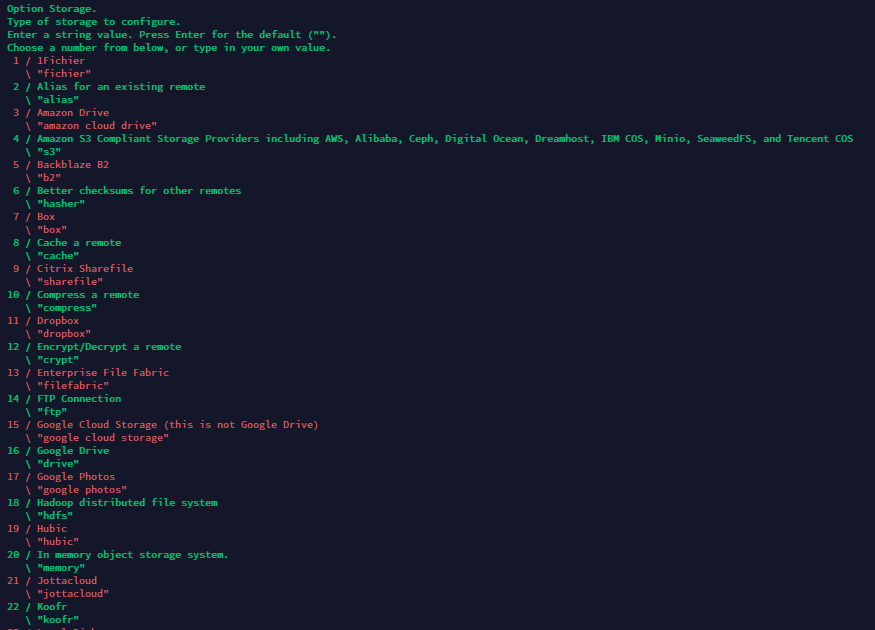
Select storage type: Google Drive
As soon as you entered a name, it will show the list of all available storage types. You are looking for "Google Drive", number 16 when I'm writing this article.
Type16 and hit Enter.
Enter your Google Drive API application settings
Rclone is now asking for the "Google Application Client Id" and "Google Application Client Secret" you created the step before. Copy/paste them and continue.
Option client_id.
Google Application Client Id
Setting your own is recommended.
See https://rclone.org/drive/#making-your-own-client-id for how to create your own.
If you leave this blank, it will use an internal key which is low performance.
Enter a string value. Press Enter for the default ("").
client_id> this_is_my_client_id
Option client_secret.
OAuth Client Secret.
Leave blank normally.
Enter a string value. Press Enter for the default ("").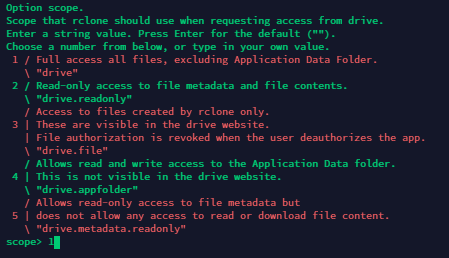
client_secret> this_is_my_client_secretNow you have to select the scope, type 1 for full access to your Google Drive and hit Enter.
Choose a folder
The next step proposes to choose a specific folder to use into Google Drive.
I have decided to create a folder called "rclone" into my Google Drive root folder as I'm using Google Drive for other purposes as well. Rclone will require the ID of this folder and it's super easy to get it, it's the last part of the URL when your are inside that folder, just after folders/.
https://drive.google.com/drive/u/2/folders/1KTYd5OhJ2k-IHLewp1WBquNN9VmwdDNjOtherwise, if you want to use the root folder of your Google Drive, leave it empty.
ID of the root folder - leave blank normally.  Fill in to access "Computers" folders. (see docs).
root_folder_id> 1KTYd5OhJ2k-IHLewp1WBquNN9VmwdDNj
Additional settings (Optional)
The next two questions are optional, leave them blank.
The first one is the "Service Account Credentials". Google Cloud Platform proposes to use Service account instead of interactive login with your personal account. In this tutorial, I will use my Google account directly. If you want to read more about authentication best practices or if you want to create a service account, everything is available in Google Cloud Platform documentation.
Option service_account_file.
Service Account Credentials JSON file path.
Leave blank normally.
Needed only if you want use SA instead of interactive login.
Leading `~` will be expanded in the file name as will environment variables such as `${RCLONE_CONFIG_DIR}`.
Enter a string value. Press Enter for the default ("").
service_account_file>
The second one is advanced configuration, type n and then hit Enter to move to the next step.
Edit advanced config? (y/n)
y) Yes
n) No (default)
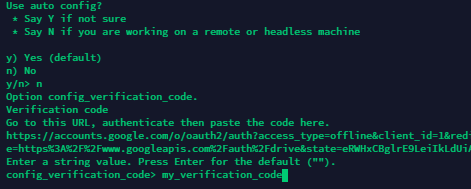
y/n> nGoogle Drive Authentication
It's now time to give rclone the permissions to use your Google Drive account.
If you are working on a Desktop machine directly, enter y and hit Enter to proceed automatically. Otherwise, if you are connected via SSH like I do, rclone cannot open a web browser to prompt the authentication window, therefore enter n and hit Enter to continue manually.
A link to Google's OAuth page is given to you, open it and authorize your rclone application to access your Google Drive account, it will provide you a verification code. Copy/paste the code in the console and hit Enter.
Team drive
The next step is to define if you want to use your main Google Drive or a Team Drive. I have no team drive so I type n and hit Enter.
Configure this as a team drive?
y) Yes
n) No
y/n> n
Final review
As a final step, rclone gives you an overview of the whole setup and asks to confirm. If you are done, type y and hit Enter.
At this moment, you are done with the Google Drive configuration into rclone. The next step is about setting up some caching and encryption on top of it. 🔐
Create the cache and encrypted rclone remote drives
You have two options:
- Start the wizard tool a second time with
rclone config, choosing option 8 to "cache a remote" and then start it a third time choosing option 12 to "Encrypt/Decrypt a remote" - Edit your
rclone.confmanually and inject the config below inside
I suggest to use the second option as you are already quite familiar with the wizard!
Edit rclone.conf
The rclone.conf file is stored in .config/rclone/ in your user's home folder.
For Synology users, the path is /var/services/homes/your-user/.config/rclone/rclone.conf
Open rclone.conf file with nano ~/.config/rclone/rclone.conf and paste the code of [GDrive1Cache] and [GDrive1Crypt] below your existing GDrive1 configuration.
Name the drives as you wish by changing the text between the brackets but keep in mind the following:
- The caching remote drive is relates to the Google Drive remote drive in its own configuration and so do the encrypted remote drive with the caching remote drive, ensure the names are correct
- Always keep the
:after the drive name
[GDrive1]
type = drive
client_id = this_is_my_client_id
client_secret = this_is_my_client_secret
scope = drive
root_folder_id = 1KTYd5OhJ2k-IHLewp1WBquNN9VmwdDNj
token = {"access_token":"AAA","token_type":"BBB","refresh_token":"CCC","expiry":"DDD"}
team_drive =

[GDrive1Cache]
type = cache
remote = GDrive1:
chunk_size = 50M
info_age = 1h0m0s
chunk_total_size = 10G

[GDrive1Crypt]
type = crypt
remote = GDrive1Cache:
filename_encryption = standard
directory_name_encryption = true~/.config/rclone/rclone.confYou are now missing only one thing to complete the configuration, the encryption keys of our encrypted remote drive!
Define your encryption keys
To add the encryption keys (password and salt) to your configuration, you need to edit the configuration through rclone config.
- Select
Edit existing remote - Choose your encrypted remote drive
GDrive1Crypt - Hit
nto not change the parameters until you reach thePassword or pass phrase for encryptionandPassword or passphrase for salt - Choose
Generate random passwordfor both and save them in a secured location in case of troubles - Finish and validate your configuration
You successfully setup on rclone:
- A Google Drive remote drive
- A cache remote drive
- An encrypted remote drive
It's now time to test and start using it! 👨🔬
Mount your encrypted remote drive
To be able to use it, you need to mount it on your server or Synology NAS.
Start by creating a folder where you want to mount it with, for example, mkdir /mnt/GDrive1on your server or mkdir /volume1/rclone/GDrive1 on your Synology NAS.
On your server
To ensure your encrypted remote drive is always mount on boot, you need to create a systemd service:
- Create the service file with
nano /etc/systemd/system/GDrive1Crypt.service - Copy/Paste the service below and update the correct path to
rclone.conf - Save with Ctrl+X and Y
- Reload the list of systemd scripts with
sudo systemctl daemon-reload - Start the service with
sudo systemctl start GDrive1Crypt.service - Enable it so it runs automatically on boot with
sudo systemctl enable GDrive1Crypt.service
[Unit]
Description=Mount GDrive1Crypt
AssertPathIsDirectory=/mnt/GDrive1
After=networking.service

[Service]
Type=simple
ExecStart=rclone mount --config=/home/thelazyfox/.config/rclone/rclone.conf GDrive1Crypt: /mnt/GDrive1 --allow-other --cache-db-purge --fast-list --poll-interval 10m
ExecStop=/bin/fusermount -u /mnt/GDrive1
Restart=always
RestartSec=10

[Install]
WantedBy=default.targetOn your Synology NAS
As it's not possible to create systemd service on Synology NAS, you need to create a task running on each boot:
- Open "Control Panel"
- Click on "Create" > "Triggered Task" > "User-defined script"
- Define a name, select "Boot-up" as Event and move to the tab "Task Settings"
- In the "Run command" section, enter the script below
- Optional: You can choose to receive the run details if there is an issue to your email address by checking the two boxes and entering your email address
- Click on "OK" to save
- Select your task and click on "Run"
rclone mount --config=/var/services/homes/thelazyfox/.config/rclone/rclone.conf GDrive1Crypt: /volume1/rclone/GDrive1 --allow-other --cache-db-purge --fast-list --poll-interval 10m Testing
You can now copy or create files in this folder and you should see them encrypted on your Google Drive! 🚀
🎉 Congrats! You have mounted your first encrypted and cached remote drive with rclone and Google Drive! Rclone is a very powerful tool with a lot of others interesting features!
If for any reason you can't access to your GDrive remote, refresh your tocken with rclone config reconnect GDrive1:
Thanks to Aerya & MrPsycho for support and resources!
Feel free to share your setup and experiences with rclone on Discord!
